
Wood Leg Refinishing Tips: Revive Your Furniture with Expert Advice
Discover effective wood leg refinishing tips to bring life back to your furniture. From preparation to finishing touches, learn how to refinish wooden furniture legs like a pro.
Wood leg refinishing tips can help you transform tired, worn-out furniture into stunning pieces that breathe new life into your living spaces. Whether you have a vintage table with faded legs or chairs that have lost their luster, refinishing the wooden legs can make a world of difference. In this comprehensive guide, we’ll take you through a step-by-step journey of turning your refinishing project into a success story.
Introduction
Refinishing wood legs is more than just a restoration process; it’s an opportunity to preserve the beauty of furniture while adding your personal touch. The process might seem daunting, but armed with the right knowledge, tools, and a bit of patience, you can achieve remarkable results. From preparing the wood to selecting the perfect finish, we’ve got you covered.
Wood Leg Refinishing Tips
Refinishing wood legs involves several stages, each contributing to the overall success of your project. Let’s dive into the step-by-step process:
Preparing the Workspace
Creating a suitable workspace is crucial for a successful refinishing project. Choose a well-ventilated area with ample natural light. Lay down protective sheets to prevent any accidental spills from damaging your surroundings.
Gathering the Necessary Tools and Materials
Before you begin, make sure you have all the tools and materials you need. Sandpaper of varying grits, wood stain or paint, brushes, rags, safety goggles, and gloves are among the essentials. Using high-quality tools ensures a smoother process and a more polished end result.

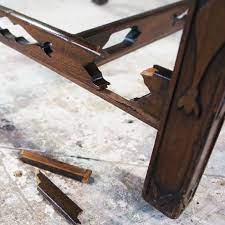
Stripping the Old Finish
Start by removing the old finish from the wood legs. Use a paint or varnish stripper to effectively lift the existing layers. This step is essential to ensure the new finish adheres properly to the wood. Follow the manufacturer’s instructions for safe and effective stripping.
Sanding for Smoothness
Sanding the wood legs is key to achieving a smooth surface for the new finish. Begin with coarse sandpaper to remove any remaining finish and imperfections. Gradually move to finer grits for a silky-smooth touch. Remember to sand in the direction of the wood grain for the best results.
Staining or Painting
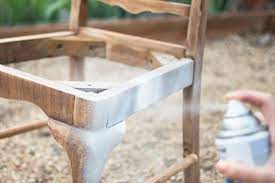
This is where your creativity shines. Choose a wood stain to enhance the natural beauty of the wood grain, or opt for paint to add a pop of color. Apply multiple thin coats, allowing each layer to dry before applying the next. This ensures a deep, even finish.
Applying a Protective Finish
To protect the wood legs and add a beautiful sheen, apply a clear protective finish. Polyurethane, lacquer, or wax are popular options. Choose the finish that aligns with your desired level of shine and durability. Apply multiple coats as recommended, allowing proper drying time between coats.
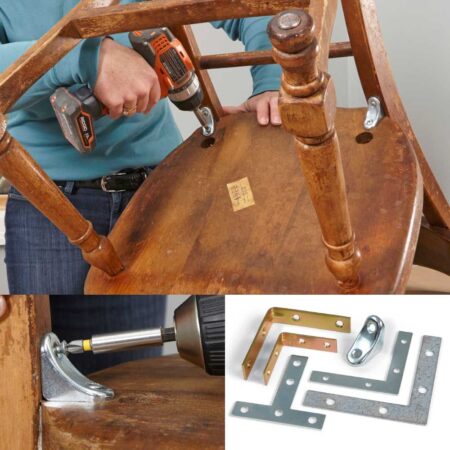
Reassembling the Furniture
Once the legs are fully refinished and dried, it’s time to reassemble your furniture. Take care to attach the legs securely, ensuring stability and longevity.
Expert Tips for Success

- Take Your Time: Rushing through the refinishing process can lead to subpar results. Patience is your ally in achieving a professional finish.
- Test the Finish: Before applying the finish to the entire leg, test it on a small, inconspicuous area. This helps you ensure the color and sheen match your expectations.
- Protect Yourself: Refinishing involves chemicals and dust. Wear safety goggles, gloves, and a mask to shield yourself from potential hazards.
FAQs
How long does the entire refinishing process take?
The time it takes to refinish wood legs depends on factors such as the number of legs, the complexity of the piece, and drying times. Generally, it can take a few days to a week to complete the process.
Can I use an electric sander instead of sanding by hand?
Absolutely. An electric sander can save you time and effort, especially during the initial stages of sanding to remove the old finish.
Should I remove the legs before refinishing?
While it’s not always necessary, removing the legs makes the refinishing process easier and more thorough. If the legs are difficult to remove, consider protecting other parts of the furniture with painter’s tape and plastic sheeting.
What’s the best way to clean wood legs before refinishing?
Wipe the legs with a clean, damp cloth to remove any dust or debris. For tougher grime, a mixture of mild soap and water can be used.
Can I use different colored stains on the same piece of furniture?
Certainly. Mixing stains can create unique effects. However, it’s advisable to test the combination on a small area first to ensure you achieve the desired result.
Is refinishing suitable for all types of wood?
Refinishing is generally suitable for most types of wood, but some exotic woods might require specific techniques or products. Research and test on a small area before proceeding.
Conclusion
Refinishing wooden furniture legs is a rewarding endeavor that allows you to revive cherished pieces and customize them to fit your style. By following these wood leg refinishing tips, you can confidently transform worn-out legs into stunning focal points that showcase your craftsmanship. Embrace the process, enjoy the journey, and watch your furniture come to life again.